


"The Origin8 Trackstar Crankset: A Single-Speed Powerhouse for Cyclists"
Introduction
When it comes to single-speed cycling, the quality and performance of your components matter more than ever. The Origin8 Trackstar Crankset is a testament to the importance of a reliable, efficient, and durable crankset. In this article, we'll delve into the key features of the Origin8 Trackstar Crankset, and why you should consider making your purchase from Live4Bikes.
Key Features of the Origin8 Trackstar Crankset
-
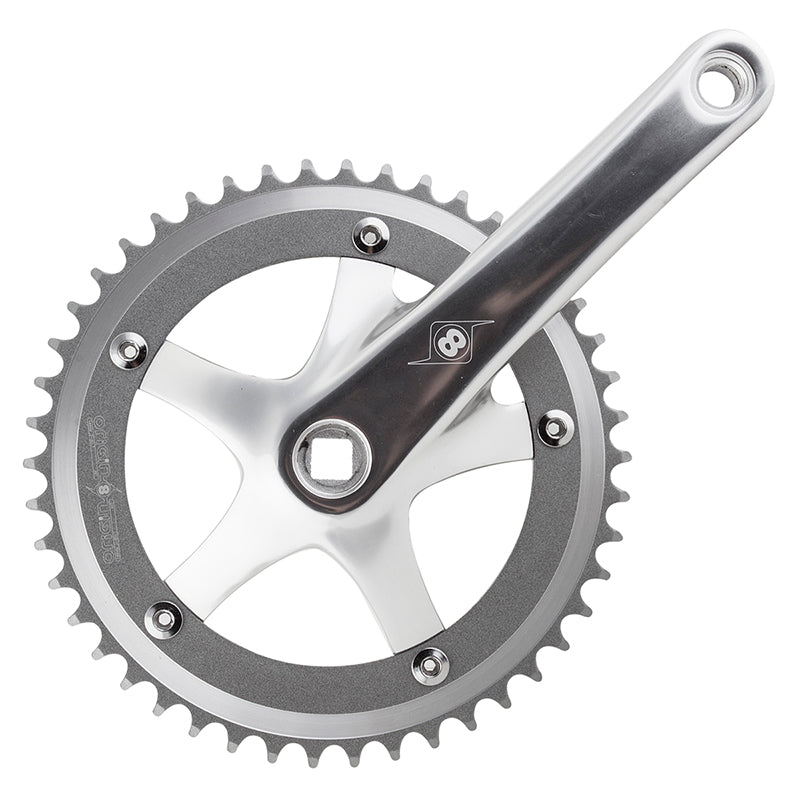
Forged AL6061-T6 Alloy Crankarms: The Origin8 Trackstar Crankset is built with precision and durability in mind. Its crankarms are constructed from forged AL6061-T6 alloy, which offers both strength and lightweight performance. These crankarms are designed to withstand the rigors of single-speed riding, ensuring a long lifespan for your crankset.
-
CNC Alloy 1/8" 46 Tooth Chainring: The 46-tooth chainring is meticulously machined from CNC alloy, providing precise, smooth, and efficient power transfer. With a 1/8" chain width, this chainring is perfectly suited for single-speed setups, delivering an ideal balance between speed and control.
-
42mm Chainline with 103mm JIS Bottom Bracket (BB): The Origin8 Trackstar Crankset comes with a 42mm chainline, which helps maintain a consistent chain tension and improves overall chain durability. The included 103mm JIS square taper BB ensures a snug and reliable fit, enhancing the crankset's overall performance and longevity.
-
Weight and Speed: The Origin8 Trackstar Crankset weighs in at a modest 740g, making it a lightweight yet sturdy choice for single-speed enthusiasts. It is designed for a single-speed setup, providing a reliable and straightforward experience for riders who prefer simplicity and efficiency.
-
Bolt Pattern and Spacing: The crankset features a 144x5B bolt pattern, which is a common choice for single-speed applications. The 5-bolt pattern ensures a secure connection between the crankset and the chainring. Additionally, the 1/8" spacing is compatible with single-speed chains, providing an optimized interface for power transmission.
Why Choose Live4Bikes for Your Origin8 Trackstar Crankset
-
Wide Selection of Quality Cycling Components: Live4Bikes is known for its extensive range of high-quality cycling components and accessories. When you purchase your Origin8 Trackstar Crankset from Live4Bikes, you can be confident that you're getting a genuine product backed by their commitment to quality.
-
Expertise and Customer Service: Live4Bikes prides itself on its knowledgeable and passionate staff who can assist you in choosing the right components for your cycling needs. Whether you're a seasoned cyclist or a beginner, their expert guidance ensures that you make informed decisions.
-
Competitive Pricing: Live4Bikes offers competitive prices, making it a cost-effective choice for cyclists looking to upgrade or replace their components. You'll find that their pricing aligns with the high value and performance of the Origin8 Trackstar Crankset.
-
Online Convenience: Live4Bikes provides the convenience of online shopping, allowing you to browse their products and make purchases from the comfort of your home. With secure and easy-to-use online ordering, you can have your Origin8 Trackstar Crankset delivered directly to your doorstep.
The Origin8 Trackstar Crankset is a single-speed crankset that combines strength, precision, and efficiency. Its durable construction and well-engineered design make it a top choice for single-speed enthusiasts. When considering where to purchase your Origin8 Trackstar Crankset, Live4Bikes stands out as an excellent option due to its wide selection of cycling components, knowledgeable staff, competitive pricing, and online convenience. With Live4Bikes, you can confidently invest in the Origin8 Trackstar Crankset and enhance your single-speed cycling experience.
| |
- More Crank info
- DIY TIPS
- Minimize Windows
Understanding Bicycle Cranks: Types, Sizes, and Materials
Introduction
Bicycle cranks are a crucial component of a bike's drivetrain, responsible for transferring the rider's pedaling force to the chainring, which in turn propels the bicycle forward. In this article, we'll explore the various types of bicycle cranks, different sizes available, and the materials they are constructed from.
Types of Bicycle Cranks
-
Square Taper Cranks:
Square taper cranks are a traditional design, characterized by a square-shaped spindle that fits into the bottom bracket. They have been a standard for many years, known for their simplicity and durability. However, they are becoming less common with the rise of newer technologies.
-
Octalink Cranks:
Shimano introduced the Octalink system, which features eight splines on the crank arm that interface with a matching bottom bracket. Octalink cranks are known for their increased stiffness and power transfer compared to square taper cranks.
-
ISIS Drive Cranks:
ISIS (International Splined Interface Standard) drive cranks use a splined interface between the crank arm and the bottom bracket spindle. This design was intended to improve stiffness and durability, but it has been largely replaced by newer standards.
-
External Bearing Cranks:
External bearing cranks, also known as Hollowtech II (by Shimano) or GXP (by SRAM), use outboard bearings that sit outside of the bottom bracket shell. This design provides increased stiffness and weight savings.
-
Direct Mount Cranks:
Direct mount cranks have become popular in recent years, especially in the mountain biking community. They attach directly to the spindle, eliminating the need for a separate chainring spider. This design allows for a wider range of chainring sizes and improved stiffness.
Different Sizes of Bicycle Cranks
-
Crank Arm Length:
Crank arm length is measured from the center of the bottom bracket spindle to the center of the pedal spindle. Common lengths range from 165mm to 180mm. Shorter crank arms can provide a more aerodynamic position and are favored by some cyclists, while longer crank arms may offer more leverage for powerful pedaling.
-
Chainring Sizes:
The size of the chainring(s) on the crankset can significantly affect the bike's gearing. Smaller chainrings provide easier pedaling but lower top speeds, while larger chainrings offer higher top speeds but require more effort to pedal.
Materials Used in Bicycle Cranks
-
Aluminum:
Aluminum cranks are lightweight, relatively inexpensive, and offer good stiffness. They are popular in entry-level and mid-range bicycles.
-
Carbon Fiber:
Carbon fiber cranks are known for their exceptional strength-to-weight ratio. They offer excellent stiffness and can help reduce overall weight, making them popular among high-end and performance-oriented cyclists.
-
Steel:
Steel cranks are durable and cost-effective but tend to be heavier than aluminum or carbon fiber options. They are commonly found on budget-friendly and commuter-oriented bikes.
-
Titanium:
Titanium cranks strike a balance between weight, strength, and durability. They are relatively lightweight and offer excellent corrosion resistance, making them a premium choice for some cyclists.
Conclusion
Choosing the right bicycle crank is essential for optimizing your riding experience. Consider factors like the type of riding you'll be doing, your personal preferences, and your budget when selecting a crankset. Understanding the different types, sizes, and materials available will help you make an informed decision that suits your specific cycling needs.
```Comprehensive Guide to Removing a Square Taper Bicycle Crank
Tools Needed:
- Crank puller tool (compatible with square taper cranks)
- Allen wrench or socket wrench set
- Bottom bracket tool (if necessary)
- Grease (optional)
- Rag or cloth (to clean and wipe parts)
Step-by-Step Guide:
-
Prepare Your Workspace:
Start by finding a clean, well-lit area to work. Lay down a rag or cloth to catch any dirt or small parts that may fall.
-
Gather Tools:
Ensure you have all the necessary tools listed above.
-
Prepare the Bike:
If you have a derailleur, shift the chain onto the smallest chainring to provide easier access to the crankset. If you have a single-speed or fixed-gear bike, you don't need to worry about this step.
-
Remove the Crank Bolts:
Use an Allen wrench or socket wrench to loosen and remove the bolts that hold the crank arms onto the bottom bracket spindle. There are usually two bolts, one on each side.
-
Use the Crank Puller:
Insert the inner part of the crank puller tool into the bottom bracket spindle. Make sure it's threaded securely. Then, thread the outer part of the tool into the crank arm threads. Tighten the outer part of the crank puller tool until the crank arm starts to come off the spindle.
-
Remove the Crank Arm:
Continue to turn the crank puller until the crank arm comes off the spindle. Be sure to support the crank arm with your hand as it comes free to avoid it falling and potentially damaging the ground or other components.
-
Repeat for the Other Side:
If you're removing both crank arms, repeat steps 4-6 for the other side.
-
Inspect and Clean:
Take this opportunity to inspect the bottom bracket and crankset for any signs of wear or damage. Clean the spindle and bottom bracket shell if necessary.
-
Reassembly (if needed):
If you're replacing the crankset or performing maintenance, this is the time to install the new one. Apply a thin layer of grease to the square taper interface before attaching the new crank arms.
-
Tighten Everything Securely:
Ensure that all bolts and nuts are properly tightened to the manufacturer's specifications. Over-tightening can cause damage, so use a torque wrench if available.
-
Test the Crankset:
Spin the crankset to ensure there's no wobbling or unusual resistance. Check that the chain moves smoothly across the chainrings.
Remember to always refer to your specific bike's manufacturer recommendations and specifications, as there may be slight variations in the process depending on the make and model. If you're unsure or uncomfortable with any step, consider seeking help from a professional bike mechanic.